Hugo 添加 Staticman 评论功能
描述
能为静态站点提供评论功能的第三方模块有很多(排名无先后)
- Disqus
- Talkyard
- HyperComments
- Remarkbox
- IntenseDebate
- Gitalk
- Gitment
- Vuukle
- Muut
且都各有其优缺点。要取舍这些模块,先明确功能与特性的需求:
- 免费
- 无广告
- 高度定制
- 评论信息保存在站点所有者可控的存储介质中
- 安全
- 迁移成本低
经过筛选,决定使用 staticman
该系统可以满足上述需求,唯一的缺点是部署步骤较多,因此撰写此文,方便参考
本文专注:无(低)成本的让 staticman 在 Hugo 中运行,因此诸如 Hugo 的安装配置,相关站点的注册等则省略
涉及应用
| Name | Description | Ver |
|---|---|---|
| Hugo | 静态博客构建 | 0.83.1 |
| Staticman | 博客评论工具 | Branch master |
| Heroku | 提供 Staticman 线上运行环境 | cloud service |
| Github | 博客代码线上仓库、评论数据线上仓库 | |
| Netlify | 博客发布平台 |
步骤
0、准备工作
在 https://signup.heroku.com/ 注册,从而为 staticman 提供云服务
若计划将 staticman 搭建在自己的平台或其他平台可省略此步骤
1、部署 staticman
假设 步骤0 已完成
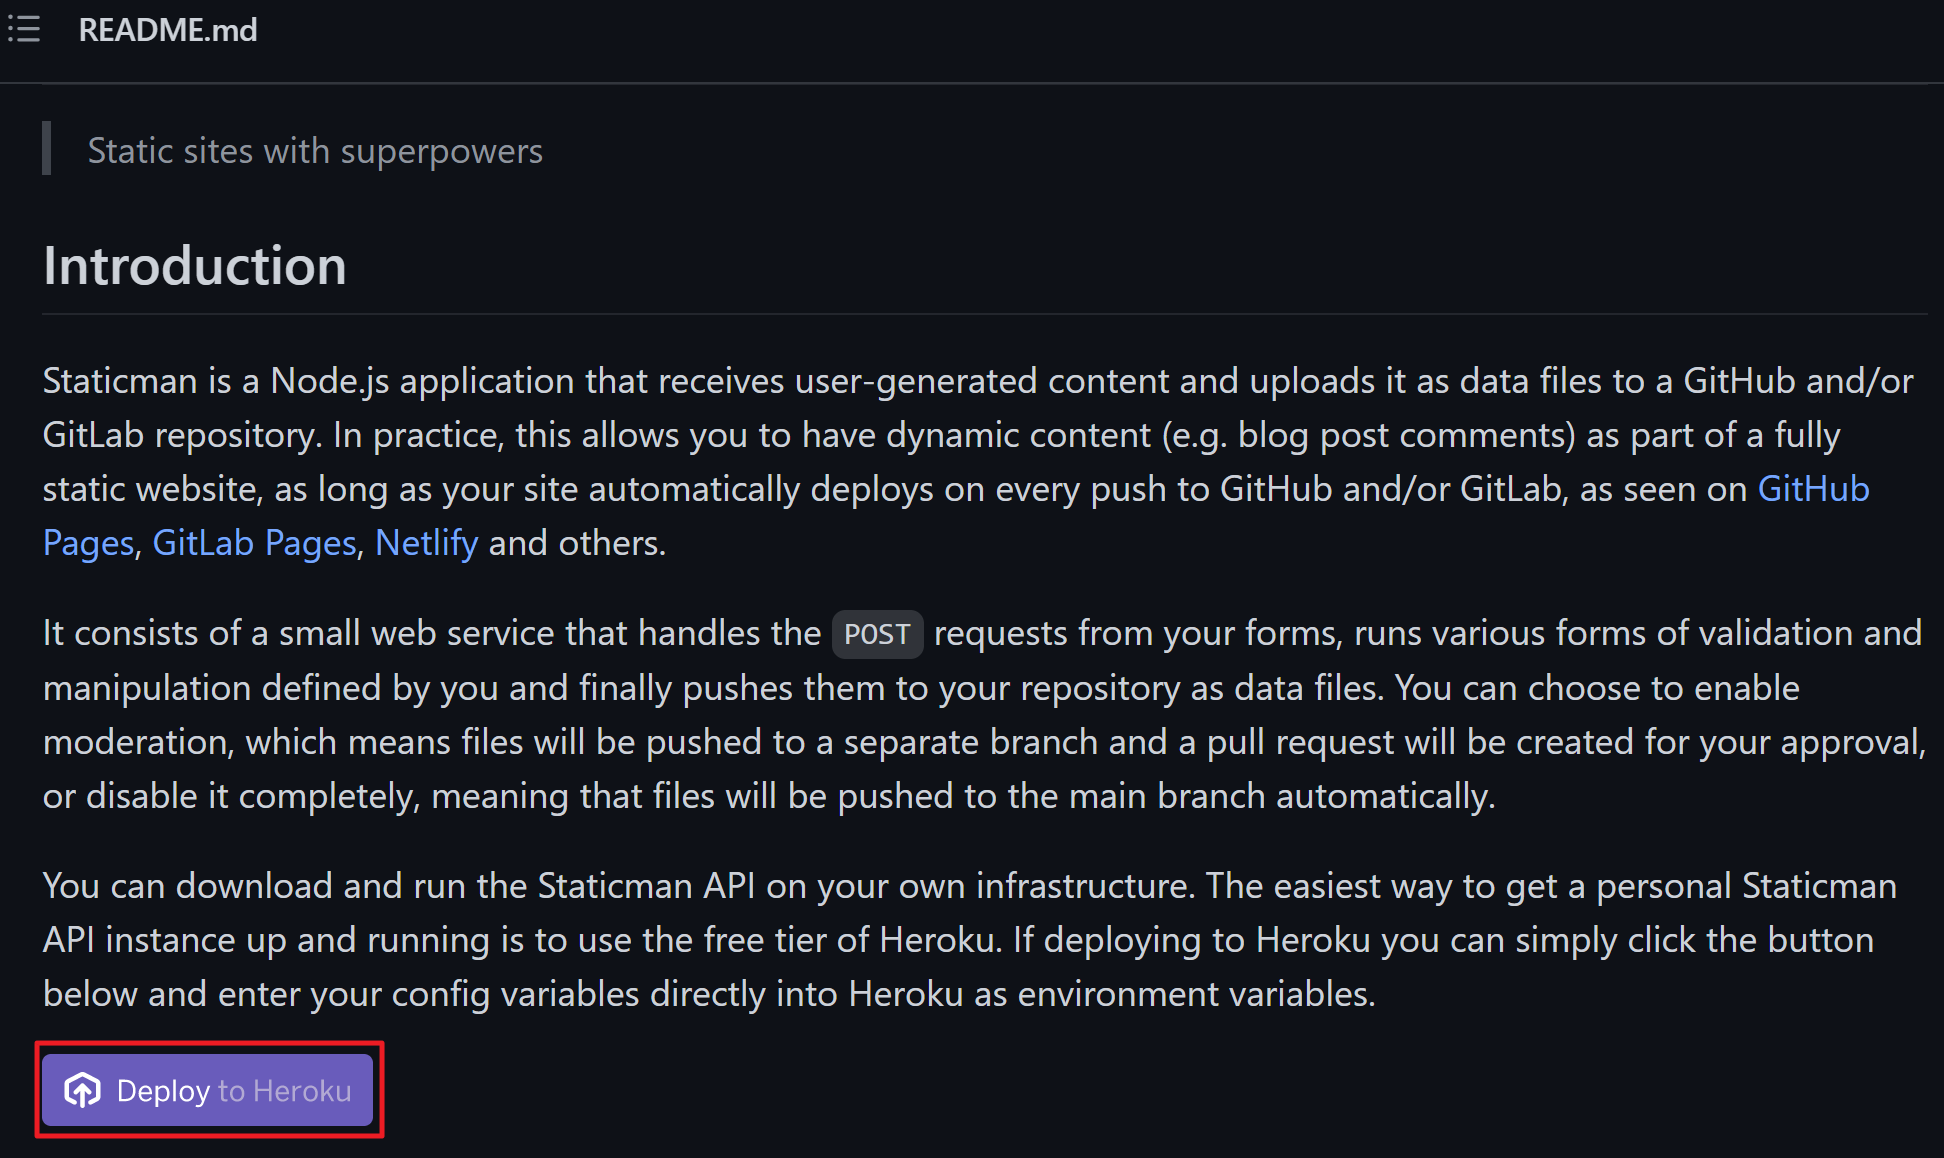
点击紫色的
Deploy on Heroku按钮,进入 Heroku 站点
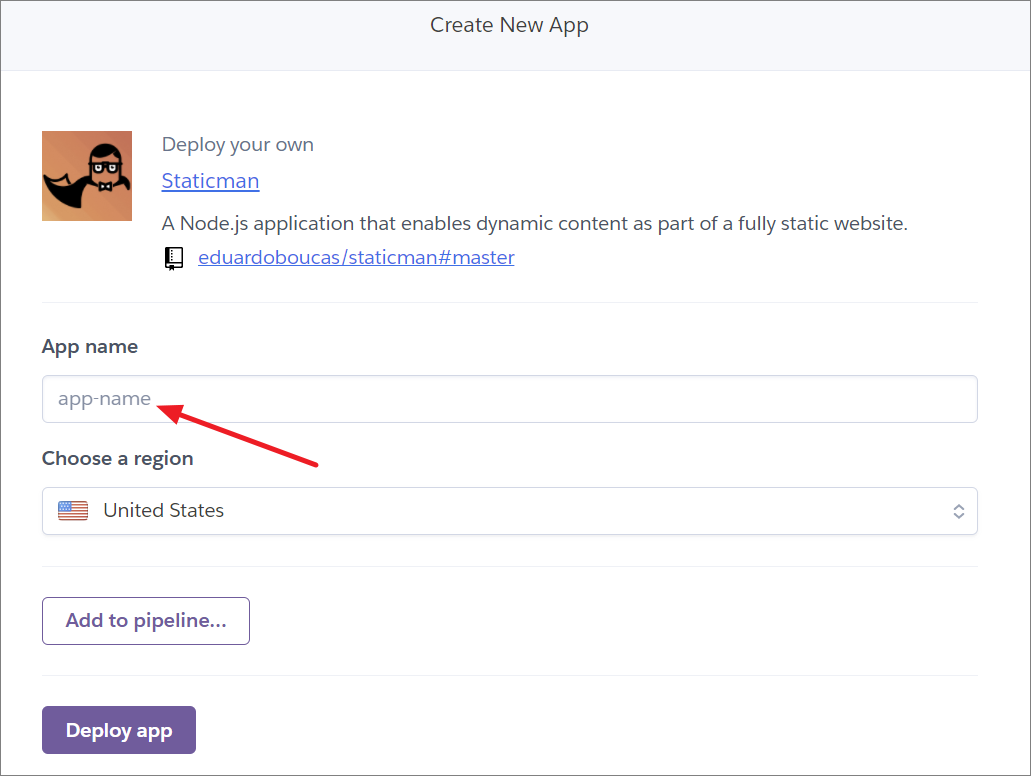
填写 App name: blog-commenter
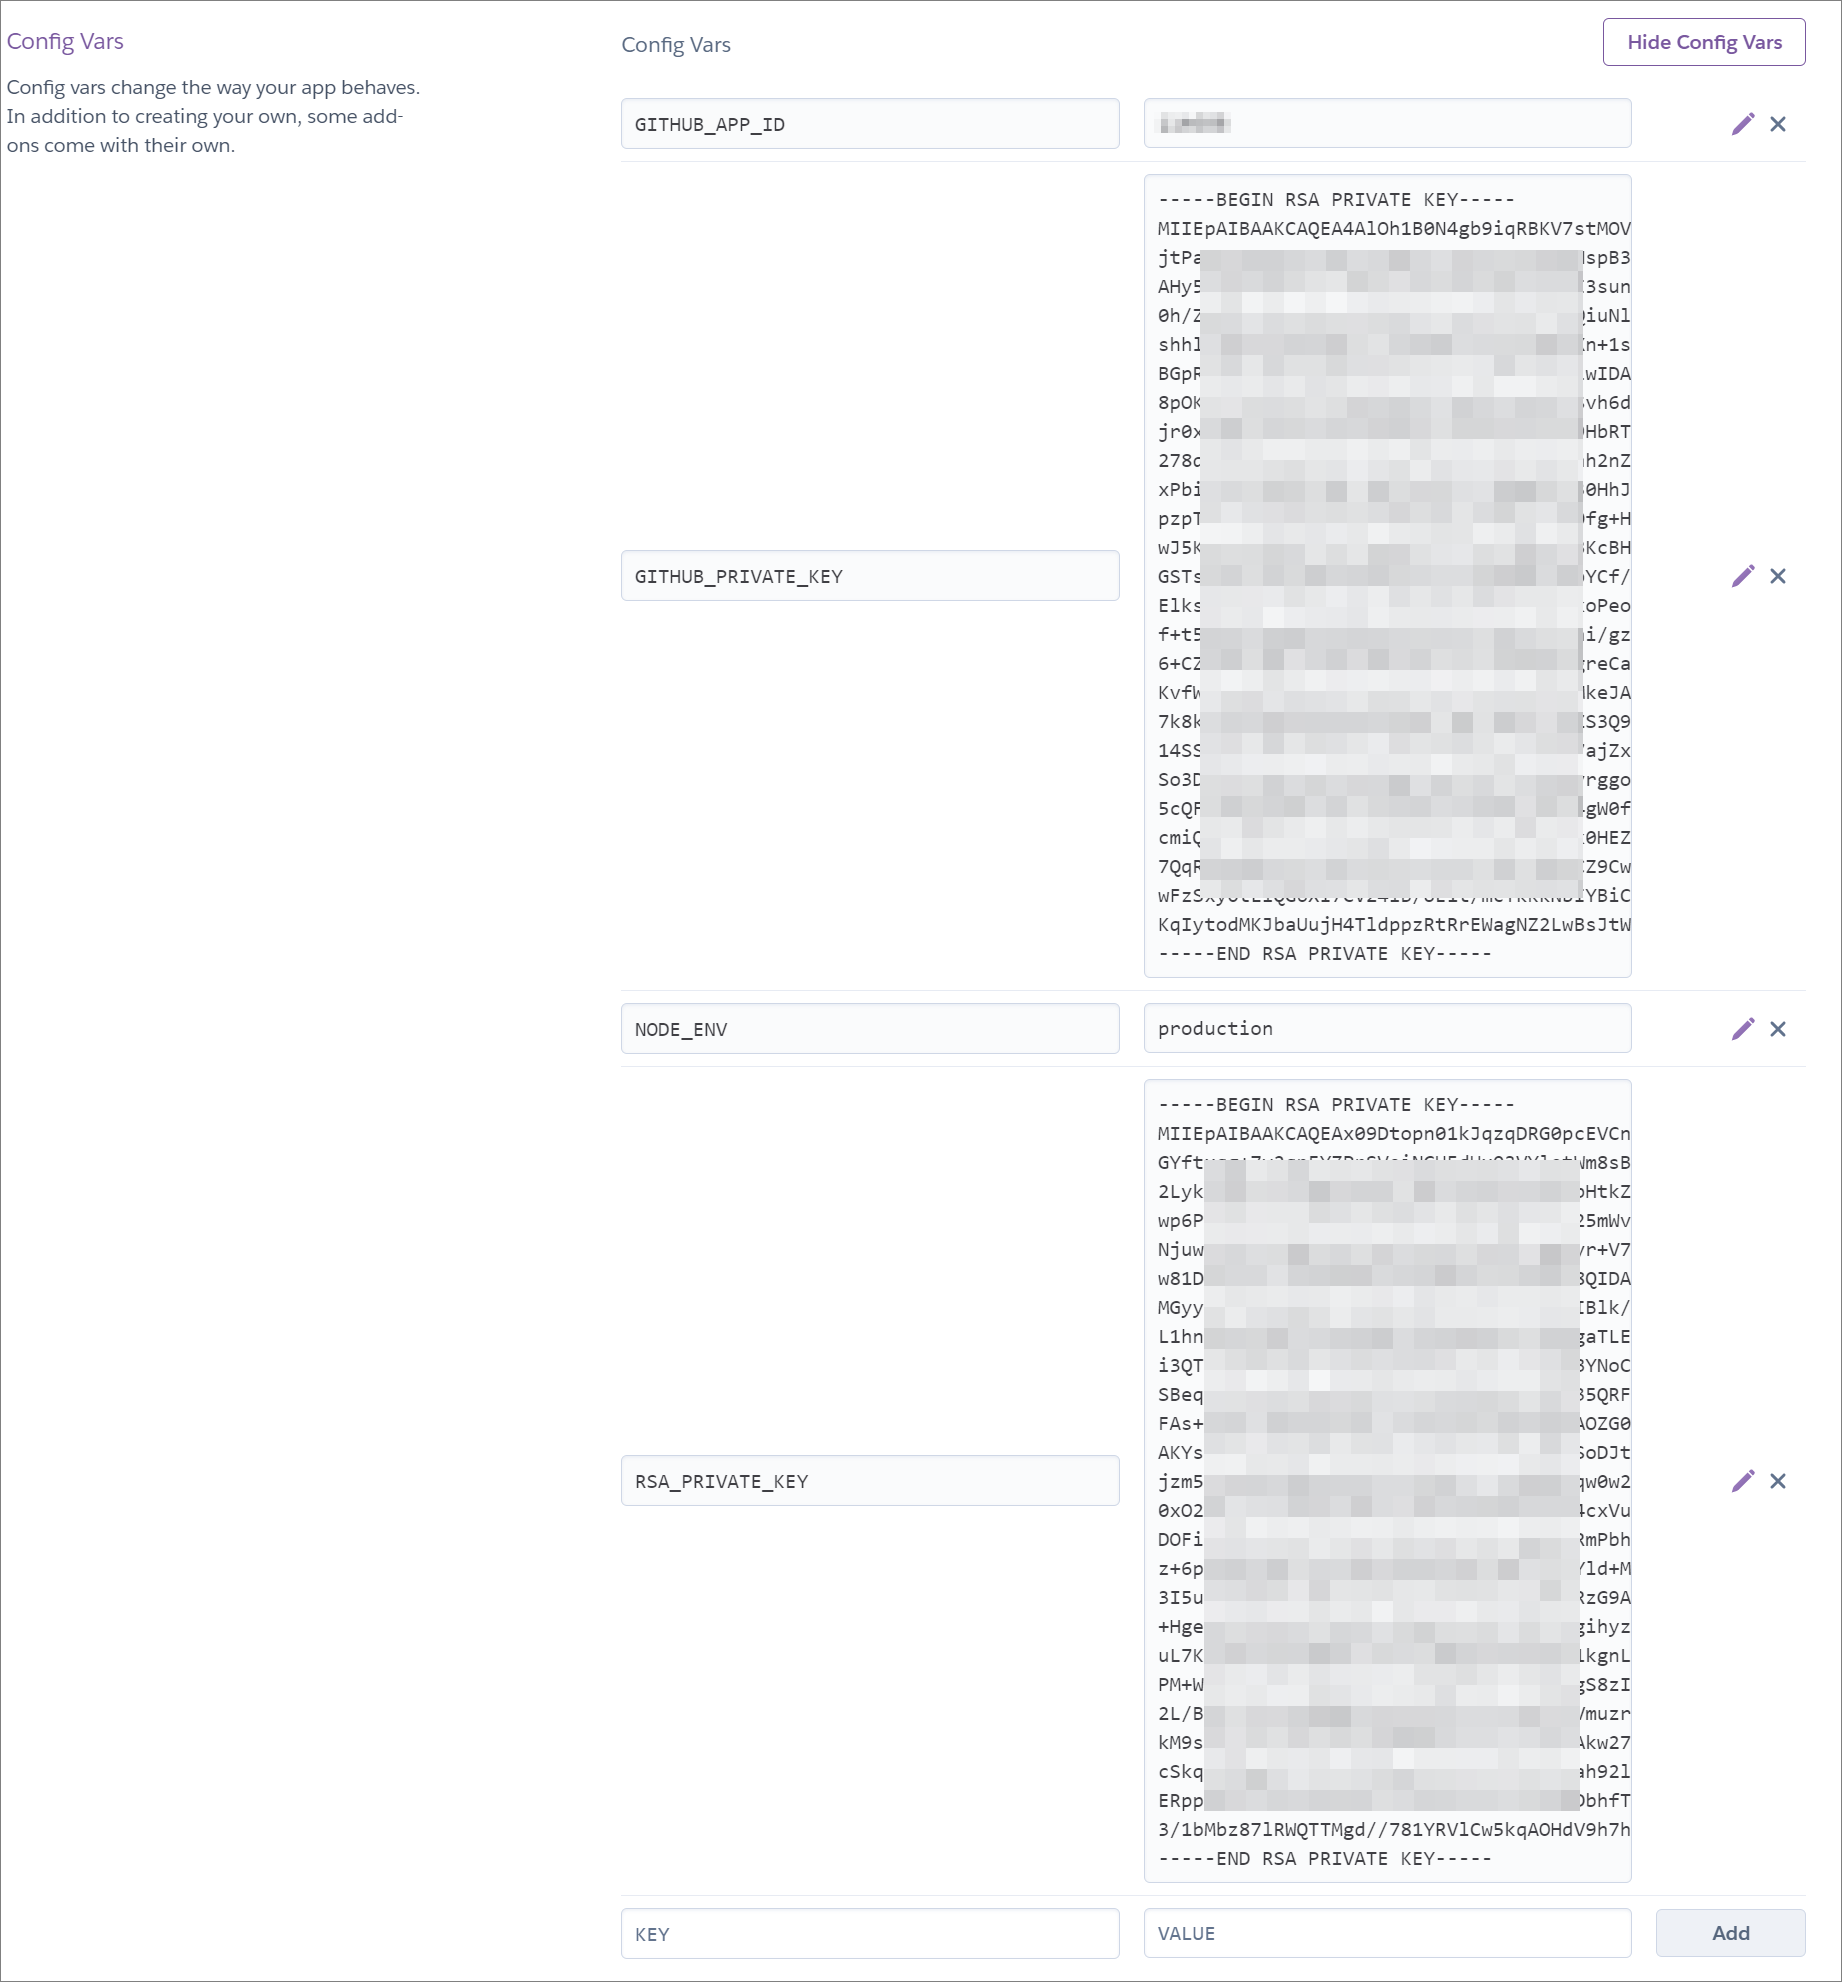
Deploy app 提交成功后,进入刚创建的 App 的 settings 页面
-
GITHUB_APP_ID: 值从 步骤2 获取
-
GITHUB_PRIVATE_KEY: 值从 步骤2 获取
-
RSA_PRIVATE_KEY: 自行生成 rsa 秘钥,例如:openssl genrsa -out key.pem;将 key.pem 内容填入
-
NODE_ENV: production
2、Github App
这是 staticman 推荐的授权方式

填写的内容包括:
-
GitHub App name: my-blog-commenter(不重名就行)
-
Homepage: https://staticman.net/
-
Webhook URL: "https://{这里的名字取自 步骤1 的App Name}.herokuapp.com/v1/webhook"
-
Contents: Read & Write - Necessary to read the Staticman site config
-
Pull Requests: Read & Write - Necessary to merge pull requests
-
Subscribe: 勾选 Pull request events
点击
Create GitHub App提交,创建成功后

点击
Generate a private key为该 App 生成私钥

浏览器会自动下载刚刚生成的秘钥,名为:xxxxxxxxxxx.private-key.pem
至此,App ID 和 私钥 都已知,分别填回 步骤1 的 GITHUB_APP_ID 和 GITHUB_PRIVATE_KEY 即可
3、评论仓库
建立单独的 repo 以存储评论数据,以 github.com 为例
本例名为blog-comments

创建成功后,进入 https://github.com/settings/apps
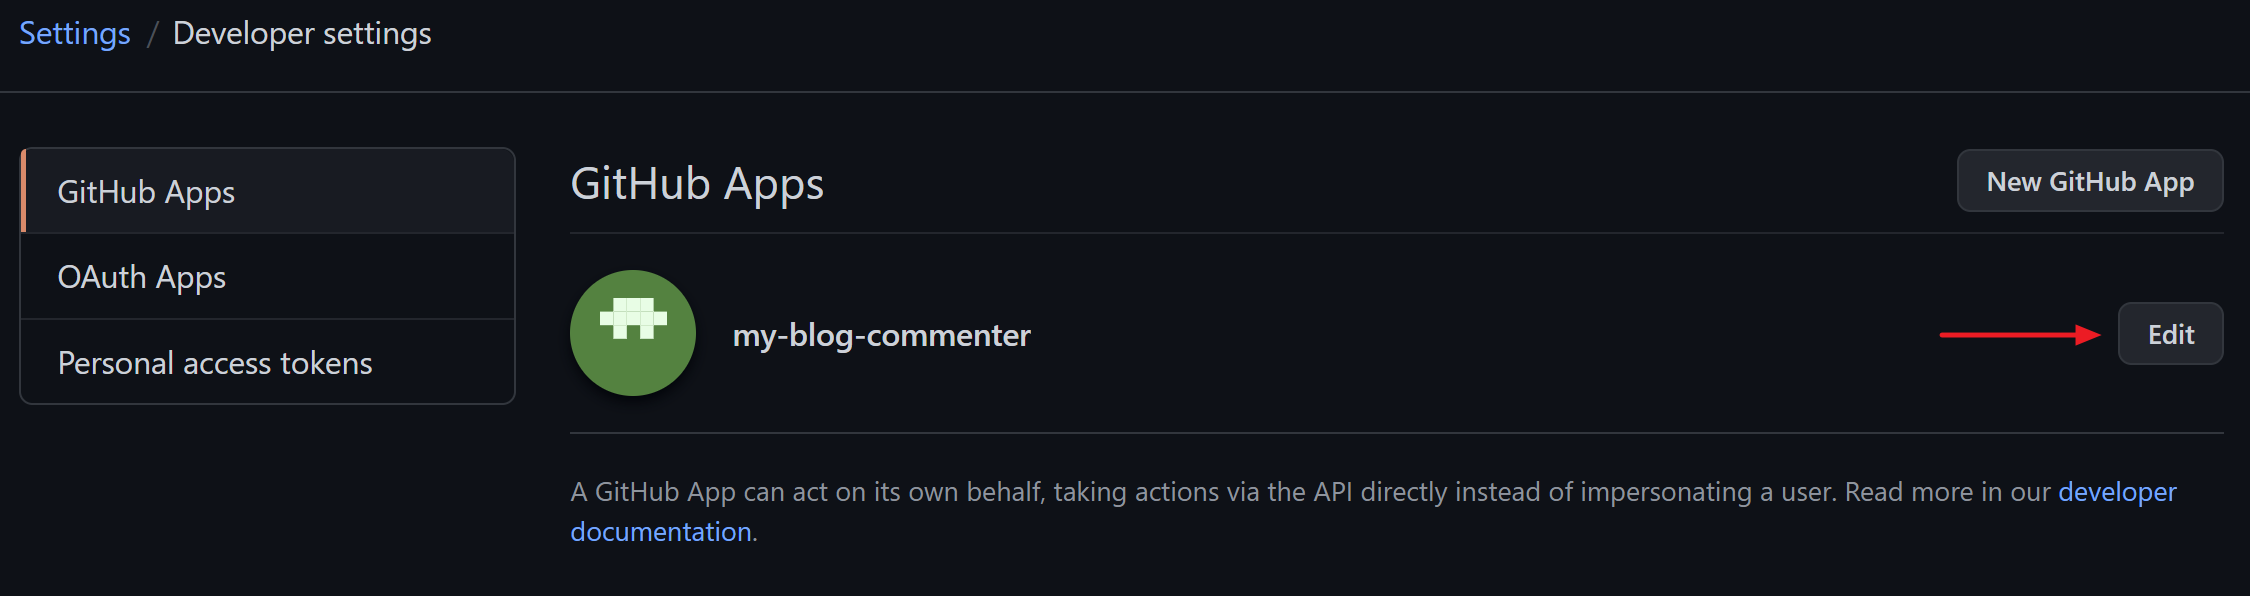
Edit编辑 App
点击
Install App,安装 my-blog-commenter 到blog-comments的所有者的 github.com 账号Repository access 设置为 Only select repositories,选择
blog-comments
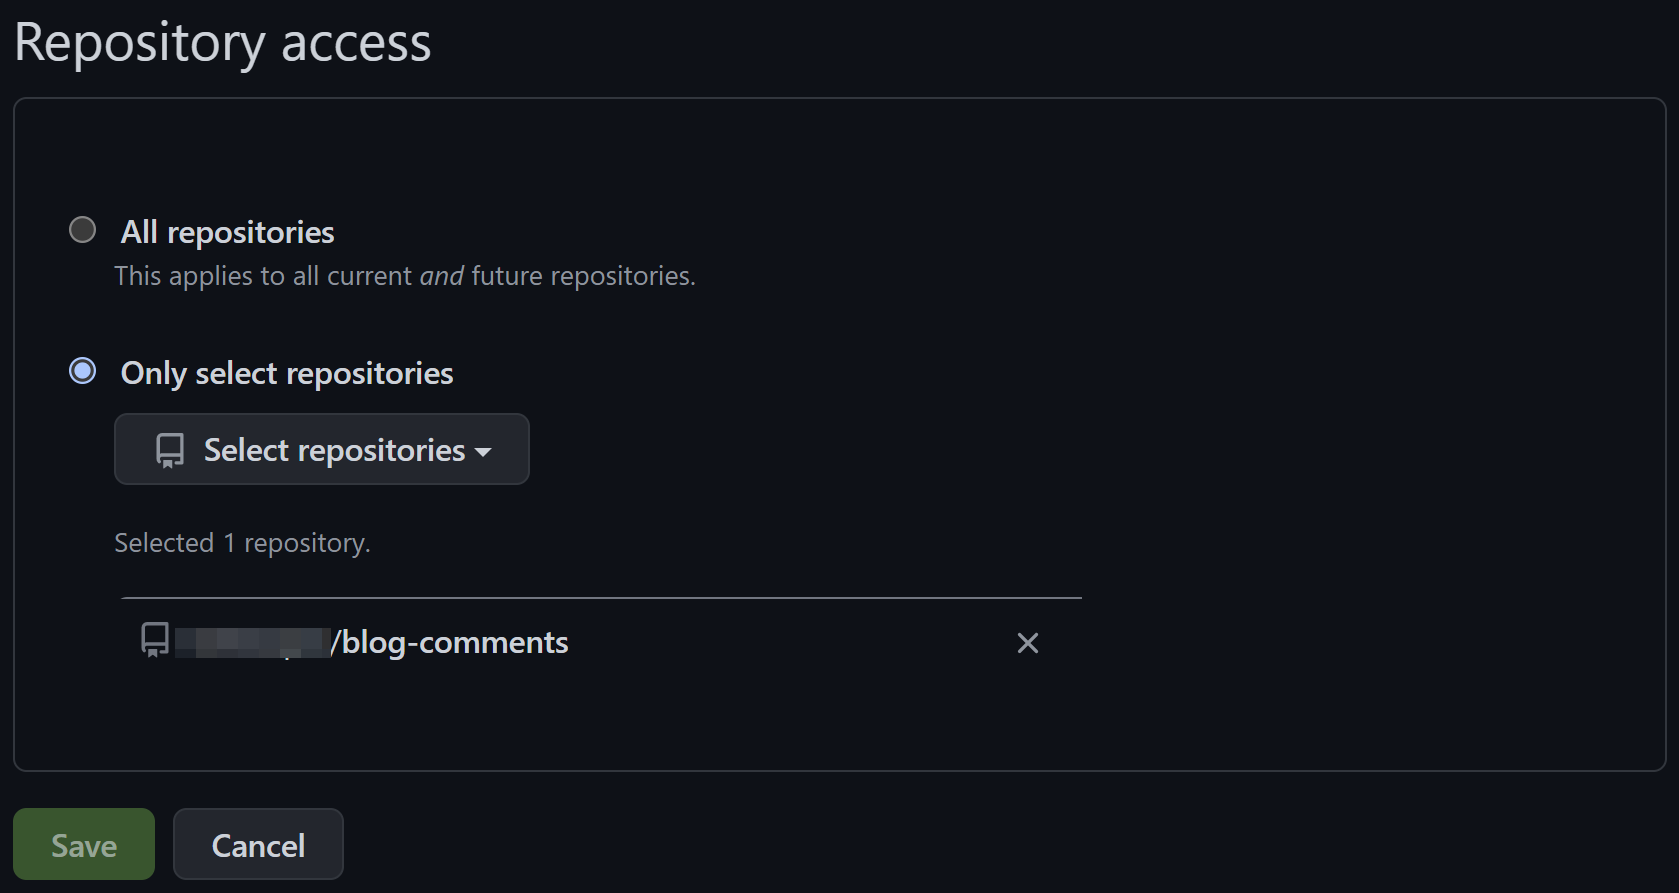
保存
4、Hugo 配置
config.toml
1[Params.staticman]
2  api = "https://{这里的名字取自 步骤1 的App Name}.herokuapp.com/v3/entry/github/{你的github账号名}/blog-comments/master/comments"
5、staticman 配置
在 blog-comments 的根下,建立:staticman.yml
注意,配置文件的名称严格对应,一个字母都不能差
staticman.yml,此例的配置可以适配 Hugo 主题 Beautiful Hugo
 1# Name of the property. You can have multiple properties with completely
 2# different config blocks for different sections of your site.
 3# For example, you can have one property to handle comment submission and
 4# another one to handle posts.
 5comments:
 6  # (*) REQUIRED
 7  #
 8  # Names of the fields the form is allowed to submit. If a field that is
 9  # not here is part of the request, an error will be thrown.
10  allowedFields: ["name", "comment", 'email', 'url']
11
12  allowedOrigins: ["yoursite.com"]
13
14  # (*) REQUIRED
15  #
16  # Name of the branch being used. Must match the one sent in the URL of the
17  # request.
18  branch: "master"
19
20  # Text to use as the commit message or pull request title. Accepts placeholders.
21  commitMessage: "New comment in {options.slug}"
22
23  # (*) REQUIRED
24  #
25  # Destination path (filename) for the data files. Accepts placeholders.
26  filename: "entry-{@timestamp}"
27
28  # The format of the generated data files. Accepted values are "json", "yaml"
29  # or "frontmatter"
30  format: "yaml"
31
32  # List of fields to be populated automatically by Staticman and included in
33  # the data file. Keys are the name of the field. The value can be an object
34  # with a `type` property, which configures the generated field, or any value
35  # to be used directly (e.g. a string, number or array)
36  generatedFields:
37    date:
38      type: date
39      options:
40        format: "timestamp-seconds"
41
42  # Whether entries need to be appproved before they are published to the main
43  # branch. If set to `true`, a pull request will be created for your approval.
44  # Otherwise, entries will be published to the main branch automatically.
45  moderation: false
46
47  # Name of the site. Used in notification emails.
48  name: "yoursite"
49
50  # Notification settings. When enabled, users can choose to receive notifications
51  # via email when someone adds a reply or a new comment. This requires an account
52  # with Mailgun, which you can get for free at http://mailgun.com.
53  #notifications:
54    # Enable notifications
55    #enabled: true
56
57    # (!) ENCRYPTED
58    #
59    # Mailgun API key
60    #apiKey: "1q2w3e4r"
61
62    # (!) ENCRYPTED
63    #
64    # Mailgun domain (encrypted)
65    #domain: "4r3e2w1q"
66
67  # (*) REQUIRED
68  #
69  # Destination path (directory) for the data files. Accepts placeholders.
70  path: "{options.slug}"
71
72  # Names of required fields. If any of these isn't in the request or is empty,
73  # an error will be thrown.
74  requiredFields: ["name", "comment"]
75
76  # List of transformations to apply to any of the fields supplied. Keys are
77  # the name of the field and values are possible transformation types.
78  transforms:
79    email: md5
80
81
6、博客仓库中引入评论仓库
将评论仓库
blog-comments作为博客仓库的 Git 子模块
1$ cd your_hugo_blog_repo_working_dir
2$ git submodule add https://github.com/{你的github账号名}/blog-comments.git data/comments
7、Netlify 配置(可选)
经过之前的操作,staticman 模块已经可以收集用户的评论;根据设置的不同,staticman 使用 Pull Requests (PR) 或直接 push 的方式将评论数据发送到 blog-comments
但是目前还需要手动的重新构建博客,才能在静态页面中显示用户的评论;想要在用户评论被接受后,自动的构建博客,需要进行进一步的设置
这里以 Netlify 为例说明
站点注册、Github 关联、域名设置等省略
7.1 Build hooks in Netlify
进入 netlify 的站点设置,选择
Build & Deploy标签在 Build hooks 栏添加新 hook
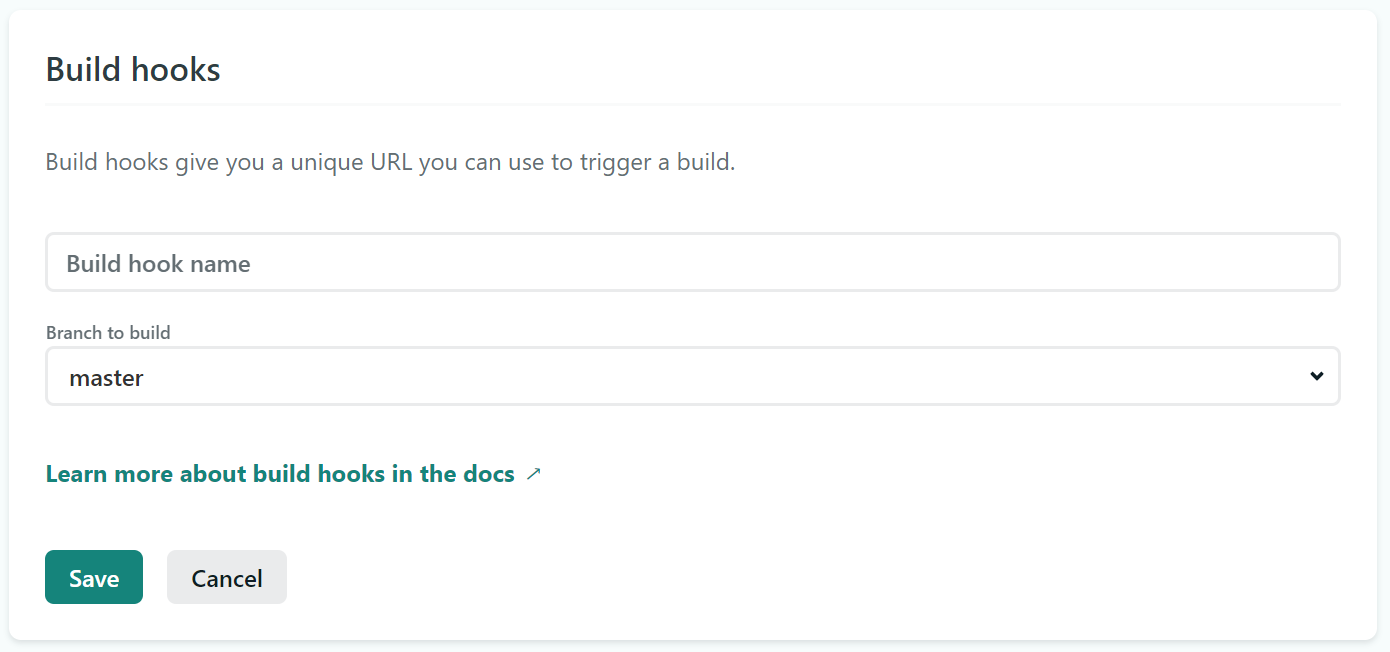
保存后,netlify 将为该站点生成一个唯一的 url,用来从外部触发自动构建
7.2 Webhooks in Github
进入
blog-comments仓库的设置页面,选择 Webhooks 标签将 步骤7.1 中得到的 url 填入 Payload URL
选择触发该 hook 的事件 ( Pull Requests、Pushes )
完成添加

7.3 Build settings in Netlify
经过 步骤7.1 和 步骤7.2 后,每当有新的用户评论被接受,Github 将通过 Webhook 的 URL 通知 Netlify 构建部署博客
但是注意:
步骤6 中,blog-comments仅仅是作为 submodule 被引入到博客仓库的,而 Netlify 的默认构建配置,并没有为 submodule 提供相应的操作,因此需要修改默认构建配置
进入 netlify 的站点设置,选择
Build & Deploy标签在 Build settings 栏,更新配置

至此,staticman 为 hugo 博客提供的评论功能,基本配置完毕
其他
扩展配置
在 staticman 的配置文件中,还可以引入验证码、评论审核、过滤等功能,详情参见官方文档